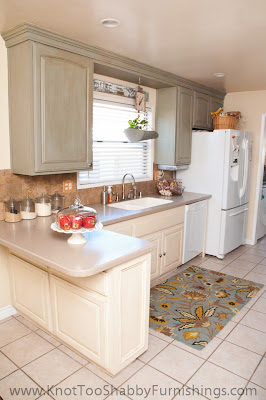
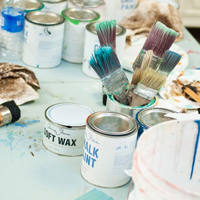
About two months ago, I decided I wanted to paint my kitchen cabinets.
But, I didn’t know if I had it in me to tackle a project as big as the kitchen.
The more I thought about it, the more I was feeling motivated to take it on.
The trick was how to manage this project in a fashion that wouldn’t detract from my family time, wouldn’t take away from my regular schedule working in the store and would still allow me to use the kitchen to prepare meals.
This is how I did it:
Pre-Planning
The best plan of action for my schedule was to do the work while my three-year old took her daily naps and my five year old worked on her homework. That allowed me approximately two to three uninterrupted hours during the day to tackle a small piece at a time. Since my five-year old does her homework at the kitchen table, I could still be engaged with her and pause to help read instructions or answer questions. It also allowed us time to chit chat while we were both working.
Day One (Sunday)
The plan was to start painting on Monday afternoon. I spent Sunday evening taping off the walls and drilling pilot holes into the cabinets and drawers where the new hardware was going to go.
Total time: About one hour
Day Two (Monday)
The trick was to think of this as one small project every day. In order to maintain the use of my kitchen, I couldn’t completely dismantle the cabinets. But, I also couldn’t start painting the cabinets and then cook a meal without waxing them. So, I thought of each individual component as its own piece of furniture. If I painted, distressed, then waxed it one at time, I could finish this project in small pieces without it feeling too overwhelming. So, that’s what I did.
I started with the upper cabinets above my sink. The plan was to do just the one cabinet on the left. But, things kinda snowballed and I ended up painting all of the uppers. It only took one coat of paint! As soon as they were dry, I lightly distressed the edges and applied wax. I finished waxing the upper left just when my little one woke up so I had to put the rest of the waxing on hold until the girls were in bed.
By the end of day one, I started and finished all of the upper cabinets!
Total Time: 3 hours
Day 2 (Tuesday)
Tackling the lower cabinets with Old White. The plan was to finish just the two beneath the bar. Once I got the first coat on, it was apparent that they would need a second coat, so while I was waiting for those to dry, I continued on to the drawers and sink (see how it just keeps snowballing). By the time I finished the first coat all the way to the dishwasher, it was dry enough to start the second coat.
I had to wait until little ones were in bed to wax them. But, by the end of the night, all of the lowers on the entire north wall was painted, distressed and waxed.
Total Time: 4 hours
Day 3 (Wednesday)
Time to start the south wall. I started with just the upper cabinets.
The painting went so quickly on those, that by the time I finished painting all of them, they weren’t dry enough to distress. So…(here comes the snowball), I painted one of the lowers. Once that got its first coat, I could distress the top ones. Then, I added the second coat to the bottom cabinet and waxed them later that evening.
Total Time: 3 hours
Day 4 (Sunday)
I had to take a three-day break because life got in the way. But, the break was completely manageable because my entire kitchen was still entirely intact and okay to be used! It just looked horrifically unfinished.
On Sunday, my husband diverted the girls to other activities so that I could get a head start before the busy week. I was able to finish the rest of the lowers by the stove and got the new hardware installed the finished cabinetry.
Total Time: 2 hours
Day 5 (Monday)
The big one. I waited to do this until last because I wasn’t sure if I was going to paint it color or Old White. In the end, I went with the color to balance the color on the far side of the kitchen in the curtains and (this is the real reason) I didn’t want to do two coats of paint.
It took all of nap time just to paint this one and and just as long to wax it in the evening.
Total Time: 4 hours
Well, you know what they say…if you want something done, give it to a busy person. Or, in my case…a busy body! It took just about 17 hours to finish the kitchen and only five days. Of those 17 hours, at least 13 of them were spent during nap time/homework time or bedtime and didn’t detract (too much) from life at home with two little girls. And, yes my kindergartner does have that much homework!
It was manageable because the project was broken up into two hour segments so that life could run its course in between.
So, my words of wisdom to those waiting for the time to finish (insert project here), think of it less as one GIGANTIC project and more like smaller projects leading to a big finish. The end is so much more rewarding without all of the headaches in between!
Link up your fun refinishing projects on our Wow Us Weekend Link Party, every Thursday night-Sunday!


This is totally inspirational how you explained that you got your kitchen painted in steps and it didn’t interrupt the use of your kitchen. I think most people…including myself would think I’d have to paint all and then paint the second coat on all and then do the finish wax. This post really illustrated how a big project can be managed. I’d love it if you linked this up at my weekly party – Mod Mix Monday!
This kitchen re-do is beautiful!! & you did it in such a wonderful way.. I could learn from you, I stress about all of my projects. I would love if you would share this at the linky party on my blog. Here is the link: http://www.lizmarieblog.com/2012/11/link-up-with-me-liz-marie-26/ I hope to see you there every week!!
xx Liz Marie
Lizmarieblog.com
You did a really great job, and I have to give you huge kudos for handling it with little ones underfoot! Did you take your cupboard doors off to paint, or just paint over the hardware?? I’m thinking of painting my cabinets and trying to glean all the helpful tips I can before starting! Thanks 🙂
Cindy
I really like the way you broke this project down. And it looks great. What is the color you used on the top cabinets and pantry cupboard? Thanks for sharing this. Paula
Hi Paula! The color was a custom mix of French Linen and Duck Egg Blue. In total, all of the uppers took 10 oz. of paint. 6 oz of French Linen mixed with 4 oz of Duck Egg. And, I used roughly a 50/50 mix of dark with clear wax on both the top and bottom cabinets.
I’d be so pleased to link up on Monday! Thanks for the invitation!
I definitely will link up. Thanks! Michele
Looks great very quaint and that rug is perfect!
Looks awesome! I’ve wondered about repainting my current cabinets with chalk paint and how it would go…I think your project has sold me. Found your like on MMS’s site…keep up the great work!
Looks wonderful! I love that you used 2 colors. You were so motivated to get this done, and you did! I’m a new follower. Come over for a visit!
I am SOOOOO impressed! What a fabulous job you did! Love it.
Wow! Amazing transformation. Love the fact that you did it in sections. I really wish I could have done that with my kitchen makeover. 🙁
Well done and very beautiful work. 🙂
Julie