I know my limits when it comes to refinishing projects. I won’t strip and re-stain pieces. Too much work and I wouldn’t do a very good job. I won’t do any upholstery that involves a sewing machine, i.e. slipcovers or chairs. I won’t sew…anything! Hate it. Enough said about that.
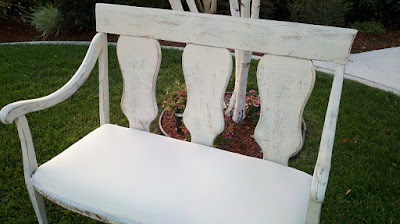
I am, however working on perfecting some areas that aren’t…shall we say…my strongest. For example, this little settee.
It isn’t a removable seat which makes it a bit more challenging of a project for me to tackle. And, one that I haven’t entirely mastered.
The first attached upholstery job I attempted was this chair.
It was challenging. The outcome was pretty good. Not perfect. But, good enough. Since I kept this chair, I was willing to take some chances and live with the imperfections.
Practice makes perfect, right?
When I did that chair, I removed all the upholstery and then painted it. That was a pain because the batting and foam was in the way. This time, I painted it before I removed the upholstery.
That made identifying where the fabric should lay real easy. Removing the fabric, not so much. Not only was it attached with glue and staples, but it also had upholstery nails attaching the trim. Fortunately, Dad helped me get all of the trim off.
When I re-upholstered the chair, I cut the fabric too large. Because it lays and attaches to the chair itself, trimming it down to size was a real challenge. For the settee, I opted to cut my pattern the exact size of the existing fabric. I used it as a guide with barely any room for error.
How did I do?
It BARELY fit…and I mean barely. There are a few places I had to improvise to cover and hide some of the minor flaws. All in all, though it looks pretty good.
I will take better pictures when I have it placed in the store for the Holiday Stroll (on November 18th). I will be selling it “at-cost” since there are some minor imperfections. I’m one step closer to getting the next one right…or at least better!


It looks amazing. The edging trim adds a nice touch too.
I want it!
I LOVE this! I would love if you would share this at the Crazy Cute link party happening at Between U & Me right now! I’ve got a totally awesome giveaway this week, too!
OOH! AND, I’m your newest follower! 😉
http://www.betweenuandme.com
The settee is great but I really love that chair~
I love settees, and this one is cute!
Oh man, I would love to call this beauty my own! You did a great job giving new life to your settee, and I’d be thrilled if you came and shared your post at the Head to Head Showdown, going on right now at http://www.icantstopcrafting.blogspot.com
~jen