
Have you ever heard of painting your counters to resemble granite? I have. But would have NEVER considered using it. I put it in the category of fake grass, fake trees, fake brick walls (have you ever seen those? It’s an applique that goes on a wall and looks like brick…except that it looks like a sticker…on a wall…CHEESY!)…you get the point.
However, about the end of November, I received an e-mail from a representative of Giani Paint asking if I would be willing to be one of 20 blogs selected to sample the paint and write about it. Are you kidding me? My little blog was deemed worthy to test a product and write about it? Heck yes.

What to paint, though. I like my kitchen counter tops so that wasn’t on the list. And I already have granite in my bathrooms. My parents desperately need new counter tops. So, I figured we could tackle that project. But, the paint kit covers 35 square feet of counter space which is about what was in their kitchen. I wasn’t sure there would be enough to get the job done. Plus, new counter tops for them would snowball into painting the kitchen, redoing the cabinets, new hardware…you know how that goes?
This correspondence from Giani couldn’t have been more perfectly timed because it just so happened that hiding in the shed was a dusty and dirty play kitchen that I was planning on refurbishing for my girls this Christmas.

For the last few years, anytime I’ve talked about refinishing this piece it always came down to “what am I going to do with the counters?” There was a laminate top on them with wood trim. I wasn’t quite sure how to update the look. Plus, they were dingy and scratched up from 50+ years of play.
PERFECT project for the new paint! It was small enough to tackle under the time frame Giani wanted me to test the product and will (over time) show how well it stands up to life.
I received my paint kit the first week of December and had to finish these counters no later than December 11th. It takes two weeks for the paint to cure, so if the kids wanted to play with it on Christmas day, I had to get to work.
The kit comes with a 15 minute instructional DVD, a sponge, small roller with two brushes and the paint.
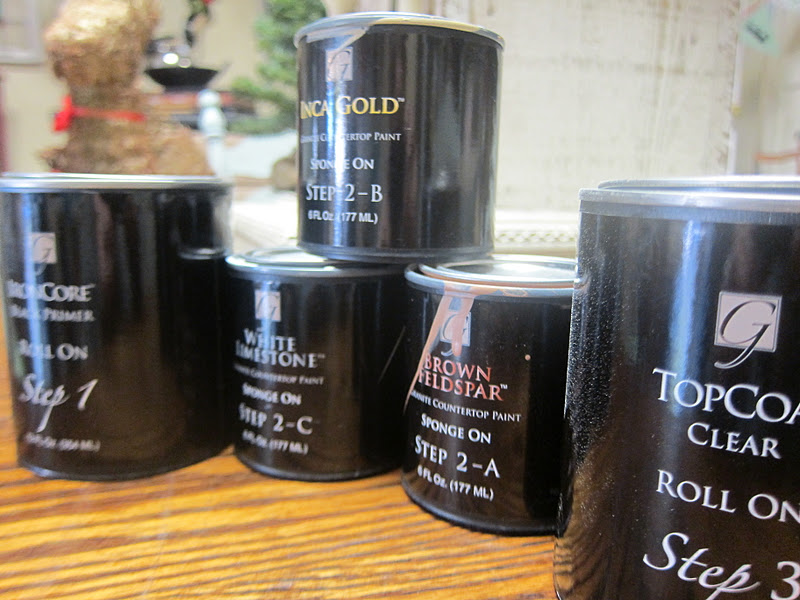
I picked the Sicilian Sand. It has a lot of different shades but is light and neutral.

Step one of the process involved rolling the black primer on the entire kitchen top. Once that dried for eight hours, the three small cans (2A, 2B and 2C) get sponged on in varying patterns and section. Each color sponges over the next while it is still wet to add different tones, blends and patterns.

For the hard to reach areas, I used an artists brush to add color.

Once the paint dried for another eight hours, the top coat goes on. And, I completely missed a step in this process. before the top coat, the surface needs to be sanded with a fine sanding block to smooth the texture and bumps. I rolled my first layer of top coat and and did a big Homer Simpson style “DOH!”

No worries (it’s just for the kids, after all). Once the first coat of top coat dried, I sanded.

Then, applied another layer of top coat. I have to tell you, it is the top coat that makes all the difference. The counters went from looking and feeling painted to that shiny and glossy look of real granite.

When it was all painted, I put the whole set on the sidewalk for people see.

The kind of comments I got:
“How did you get granite counters on a play kitchen.”
“That looks totally real!”
“Those counters must be heavy.” (Not so much, it’s just laminate)
“That’s amazing!”
“Unbelievable.”
So, what’s my assessment of this whole process?
This paint was really easy to work with! I was pleasantly surprised at how real it looked in the end. I wish I had done a few things differently. One of which was filled in some of the seams between the wood and laminate so that the counter looked like one solid piece.

The instructions allow for any scratched surfaces or dings in the counters to be filled with wood filler and sanded down so that when it is painted, you get a flawless surface.

I should have taken that extra step where the wood and laminate met. I honestly didn’t think it would be so noticeable when it was painted.
The instructional video also suggests as a last step to use an artists brush to paint natural looking breaks or flaws within the counter. I did that on one section of the kitchen and thought it looked ridiculous. I’m not an artist and when I started adding the lines and “cracks,” I felt that it started looking fake.
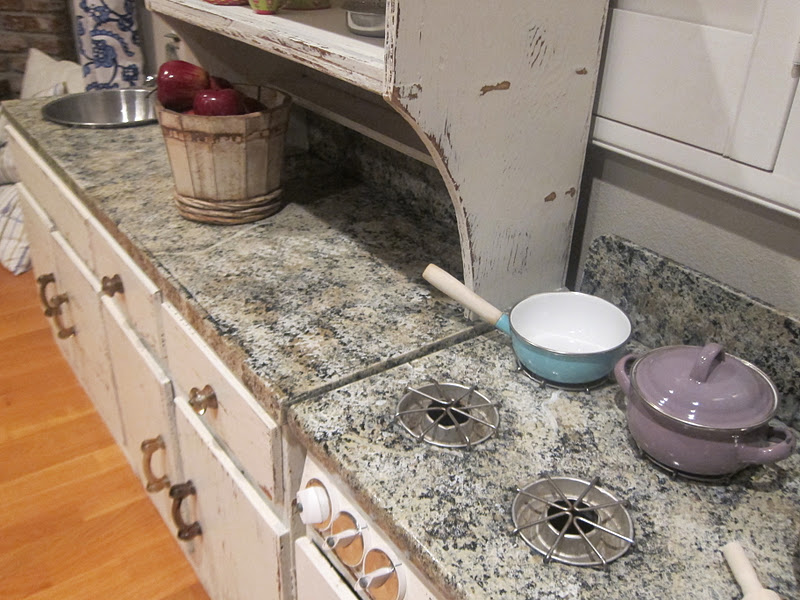
You can barely see on the middle section where I added some “rock flaws.” When I use this paint in the future, I won’t add any of those embellishments.
Now that it’s all said and done, I love how the whole project turned out! It looks like a miniature version of a real kitchen and I would definitely use this paint on other projects!
I have enough left over for a desk top that I have in mind. 🙂 stay tuned for more on that project!


Oooh, I’ll bet your girls will love this set! they turned out great, and I have to say that granite look paint job is pretty remarkable. Great review for someone looking at options for a kitchen remodel!
Nice! I got my kit and started it today. Looking around online for advice I found your blog, thanks!