
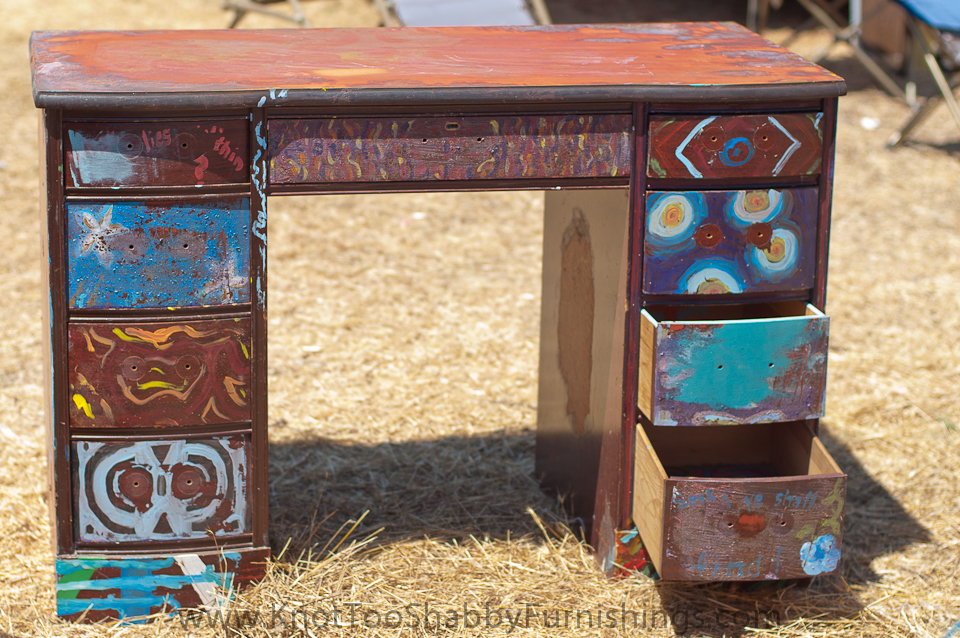
My friend Mike scored this desk at yard sale. OK…well, scored isn’t really the right word. Let’s just say this…I did one of my yard sale slow down moves one day. That’s where you come up to a yard sale, slow the car down and do a very quick scan to see if it’s worth parking and getting out. I saw this same desk, scanned the rest of the sale and moved on. Didn’t even get out. Then, Mike sends me a picture of the desk…”check out what I got.” I told him he was crazy!
Well…guess where this desk ended up. First, Mike’s garage where he attempted to remove the paint only to discover that it wasn’t solid wood and was stripping the finish down to the heavy pressboard. Next, the knot too shabby Bazaar where it sat amidst the hay, lonely and unwanted. Finally, it landed in the storage unit behind the store, not even worthy to have its own post on craigslist or the website.
Me, being a glutton for punishment was itching for a challenge. Last Sunday, while the rest of my family took an afternoon nap, I made my way to the store to enjoy refinishing a piece in peace, while we were closed and in the glorious 76 degree store. I dragged this out of storage, took a deep breath and went to town!
The only way to salvage this desk was to mask the lovely hand paintings was to decopauge. Sadly, even the drawers had paintings in them inside and out.
Clearly, someone put a lot of time and effort into the artwork on this desk.
This was more than I bargained for. sigh.
I spray painted the inside and outside of the drawers black to cover all of the hand paintings. The plan for the bottom of the drawers was to line them with vintage sheet music, same as the drawer facing.
I used Old Ochre on the woodwork and lightly sanded the remaining paint and varnish off the top so not to get down to the pressboard.
I used dark walnut wood stain for the top. But, because this wasn’t a solid, grainy wood, the stain didn’t soak in and just smeared right off when I wiped it down. So, I lightly sanded the first coat of stain and tried for a heavy second coat. Fortunately, the stain I used was almost gone so that last little bit in the can was the thick, gooey stuff at the bottom when all of the sediment settles. The stain went on more like a thin paint. I decided to defy standard refinishing techniques by “painting” on the stain with smooth even brush strucks and letting it dry rather than wiping it off. It was a definite gamble…but this is how it turned out.
Mind you, it took two full days for the stain to dry, but it took to the finish and doesn’t look half bad! Once it was dry, I used a fine 220 grit sand paper to smooth the finish and coated it with dark wax to seal and protect it. Then I added some distressing to the paint around the edges and added dark wax all over the desk.
It’s hard to believe it is the same desk!
I added three new pieces of hardware to the top row of drawers and used vintage knobs for the bottom six. I would have liked these knobs on all the drawers but didn’t have enough. So, I make do with what I got on hand.
Then, I lined the inside of the drawers.
I covered up almost all of the hand painted art…with the exception of one drawer. I left the original artwork on one side of the inside of a drawer in honor of its original artist. Just a little touch (Okay…who am I kidding? I ran out of spray paint).
Before
After


WOW – just love it – beautiful transformation!!!
Amazed! Great job as always.
It looks amazing!!!!!
Wow…looks fabulous!
Amazing transformation!
Very nice job. I was using dark walnut stain tonight and think it is too light. Perhaps I’ll do the same thing you did to get the dark color!
This looks great! The before photo had me laughing. Wow! The knobs are just amazing.
I think it looks Awesome! what a terrific job. Nothing like making a silk purse from a sow’s ear… Great Job